Showing posts with label custom. Show all posts

Monday, November 23, 2020

BARGE II

 Quick update

The second CMR barge is taking shape and as the photo shows, I'm making the full 110' length model. All parts were cut from their sprues, sanded, and laid out on the bench for a test run. The exterior braces are not shown (68 total), as well as the four interior lateral bases. They can be seen in last week's update, should anyone be interested.

    
Dry run
 

And of course, I ran out of solvent before she was done. I was using SciGrip 4, but rather than filling up the needle-tipped bottle, I switched application methods and used a small brush which allowed more control over the amount I was using. I placed an order for SciGrip 3 (which reaches 80% strength in 24 hours instead of 72 hours), plus a medium-bodied tube of solvent for comparison. Assembly will continue as soon as they arrive.


Solvent

Wednesday, November 18, 2020

NOVEMBER PROGRESS REPORT


BULK COMMODITIES

In accordance with the railroad's theme as a cog in the Nation's Basic Materials & Primary sectors, barges and a towboat were deemed an appropriate addition to my river-rail transload operation. I did some internet searching and found laser-cut acrylic kits offered by Custom Model Railroads. After browsing and getting distracted by all of their other cool stuff like skyscrapers and lift bridges, a barge 3-pack and towboat was purchased.

It has taken me a long time getting to this point, mostly due to a bit of intimidation. These kits are more advanced than what I typically build and are made of acrylic, an unfamiliar material. As such, I let the project fester on the shelf since delivery, paralyzed by analysis. I already had the real estate picked out and riverfront partially landscaped, so I finally forced myself to flip through the directions and dive in.

One barge has been assembled thus far but the other two should go a bit quicker after familiarizing myself with the multitude of parts, and working with acrylic solvent from a needle-tipped bottle. Filling and sanding the interior bracing pockets was slightly tedious, so they'll be hidden with coal or aggregate loads on the remaining two kits. Overall, I've gained some confidence with these acrylic kits and look forward to beginning construction on the tow boat. I'm considering ordering their double track lift bridge for the next layout, too...

The instructions are well written (and give scale to the kit) 
"Fiberglass" covers are provided, molded out of white styrene

Squadron putty applied and sanded smooth, per the instructions

An overview. Deck bracing is optional if a load or covers are added. I think the next two will be loaded...

Deck details still need to be applied    

CMR's double track bridge, nearly 47" in length

MODELING A.D.D.

The second project is a pair of EMD SD45s that have been in progress for about two years, which were originally painted for the C&NW. With the latest and greatest SD45s available from Scaletrains, I don't know why I'm still heading down this path, but I digress. The hardest part was stripping Kato's paint but the 91% eventually did its job, and details were then added. ESU Loksound decoders with proper 20-cylinder sound files are installed, along with dual sugar cube speakers. Eventually they'll get a paint job and LED lighting. 

I have not made a decision about the handrails yet, as we all know the standard KATO parts are a bit chunky. I may order the etched variety from KV models or go another route with parts already on hand, i.e. Athearn metal parts. Sure, they're not as detailed, but from afar they look decent to my eyes. We'll see how much motivation I find.

The snow shields and air conditioner are why I like freelanced modeling: I added them because they look cool. There's a GP35 that will go along with these two which is in the same condition, but she's hidden away in the modeling closet. All three show various aftermarket modifications such as anti-climbers, relocated horns and headlights, along with an ECAFB* that hints at electrical upgrades, but under the hood they still retain 20-cylinder prime movers. 

*Electrical Cabinet Air Filter Box, typically a sign of dash-2 electronics. It's on the left side walkway behind the cab.

Moderately modified by CMPS but the 20-cyl is still under the hood. AS IT SHOULD BE.

Freelanced 20-cylinder rebuilds. Maybe SD45M-2?

Thanks for reading and I'll have some photos of the tow boat for the next update.


Saturday, February 1, 2020

SCRAP YARD

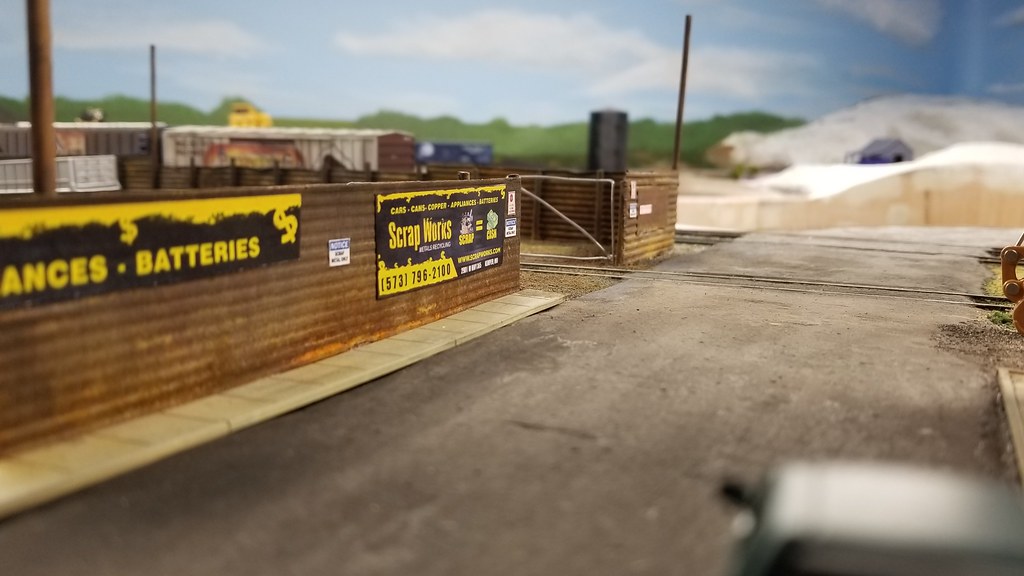
I don't have much time for writing, so here's a few pictures of the local scrap yard. 


In the interest of economics, I decided to attempt the rusty, junky look using sawdust and washes of India ink. The piles are still drying, so the scene isn't completely done yet...I may add some more "rust" effects and junk laying around too. 


The signage was simply printed on glossy paper I had in the stash, then cut out and glued to the fencing with some brand of tacky glue. It seems like "SCRAP WORKS" is a real business, but I went into MS Word and added a Missouri area code and fake address to give a sense of place.


The rusted, beaten-up walls were created with self-adhesive insulation tape that I embossed on a sheet of styrene, using the end of a paint brush. A million-dollar project, for sure!


Oh yeah, the ground and scrap yard walls were weathered using a "rust" solution and paint sold by Modern Masters. I think I got the idea from Jim at JSSX, who used it to beat up some gondolas, if I remember correctly...

The last photo I've got right now is the material handler I found on Amazon for about $12...so I bought three! They came with a magnet too but the chains they used don't really let them hang properly, so I've got the clamshell in use right now until I can modify those parts. This guy was weathered with a spray of Testor's clear flat (protecting the windows with Micro Mask), then shot with an India ink wash out of a small pump bottle. Probably a little too heavy, but that's fine. It's in a junkyard after all.  


Monday, January 20, 2020

MONTHLY UPDATE

After checking out and commenting on some of fellow modeler Rodney Walker's efforts on Flickr, he suggested I join The Weathering Shop's Rustbucket forum. Tons of great inspiration and examples of all kinds of weathering techniques. Just for fun and "street cred" (hopefully...), I added this photo of IMRL 232, completed in 2013 by CMPS and eventually sold off on Ebay. I'm really, really regretting that decision.


The unit was an undecorated Athearn/RPP shell that I assembled per prototype photos. The cut levers were custom formed out of brass wire, probably .012", to suit my own pedantic requirements. She was painted using Polly Scale UP colors and weathered with the standard chalk/Dullcote method, all the white ensuring that the windows stayed squeaky clean. A simple NCE decoder was then installed for maximum operating ability and lighting control. 


If the headlight and ditch lights look a little odd, that's because I used inset smd LED's set into the housings for maximum brightness and output. Running all the wires can get a little tedious, especially when putting the shell back onto the frame, but the results are worth it. 


Wednesday, January 1, 2020

NEW YEAR NEW POST

Happy New Year, etc...

Within the past few days I completed a small project that's been on my mind for a little bit, so here we have two trench boxes that I cobbled together from some scrap styrene sheet (.060"?) and rod. 


I should have taken more in-progress photos, but they're relatively simple to figure out. I gathered some dimensions from a company that sells these out in the "real world". They were finished with some chains and lifting lugs from that leftover 18awg wire, then weathered with a combination of acrylic paint and weathering powders mixed up with very dilute Mod Podge. 
The weathering technique was very similar to how I modeled some steel ingots last year. For that project, I simply used some flat clear acrylic and weathering powders and brushed it on. Athearn provided the parts from some of my old Blue Box projects...


Saturday, December 21, 2019

USDOT/MODOT BRIDGE PROJECT

 Temporary lane dividers installed.
 Various construction materials and storage container added...
 Safety railings for personal protection.
 Eye-level overview of the scene.
PALUMBO was selected as the contractor for this project...in a non-corrupt type of way.

CLLX 9012 & 9011

Chicago/Consolidated Locomotive Leasing 9011 and 9012 get their daily inspections before heading out into the real world on March 20, 2013.

WAY BEFORE RAPIDO BRO

Way back when, before Rapido came out with their (better/best) interpretation, CMPS built nearly ten variations of Amtrak's NPCU "cabbage" cars. 

AMTK 90215 rolled out of the shops on Sept 26, 2012.