Sunday, February 16, 2020

LAST TRAIN ACROSS CANADA

I finally digitized one of the documentaries from my childhood even though I'm sure that an ***official*** VHS or DVD copy exists somewhere, but I've had this tape since I was a kid. 

Back then I primarily enjoyed the railroad content but now as an adult, the North American cultural and political discussions are interesting and thought-provoking as well. Plus you can't beat those old scenes of steam-heated passenger equipment...

Last Train Across Canada w/ Murray Sayle, part I


Last Train Across Canada w/ Murray Sayle, part II


The audio isn't the greatest and there are  copyright claims for the music, but so far YouTube has not taken it down. I'm not interesting in monetization in any way because I wanted to post this for the educational, historical and cultural value. 

Oh yeah, my channel has some other model railroading stuff on it too.

Saturday, February 1, 2020

SCRAP YARD

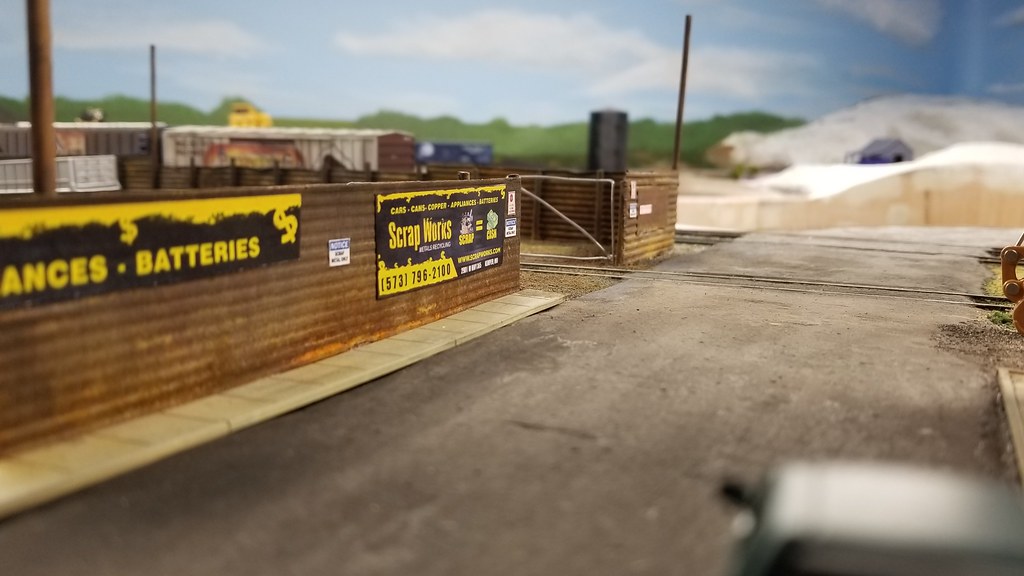
I don't have much time for writing, so here's a few pictures of the local scrap yard. 


In the interest of economics, I decided to attempt the rusty, junky look using sawdust and washes of India ink. The piles are still drying, so the scene isn't completely done yet...I may add some more "rust" effects and junk laying around too. 


The signage was simply printed on glossy paper I had in the stash, then cut out and glued to the fencing with some brand of tacky glue. It seems like "SCRAP WORKS" is a real business, but I went into MS Word and added a Missouri area code and fake address to give a sense of place.


The rusted, beaten-up walls were created with self-adhesive insulation tape that I embossed on a sheet of styrene, using the end of a paint brush. A million-dollar project, for sure!


Oh yeah, the ground and scrap yard walls were weathered using a "rust" solution and paint sold by Modern Masters. I think I got the idea from Jim at JSSX, who used it to beat up some gondolas, if I remember correctly...

The last photo I've got right now is the material handler I found on Amazon for about $12...so I bought three! They came with a magnet too but the chains they used don't really let them hang properly, so I've got the clamshell in use right now until I can modify those parts. This guy was weathered with a spray of Testor's clear flat (protecting the windows with Micro Mask), then shot with an India ink wash out of a small pump bottle. Probably a little too heavy, but that's fine. It's in a junkyard after all.  


Monday, January 20, 2020

MONTHLY UPDATE

After checking out and commenting on some of fellow modeler Rodney Walker's efforts on Flickr, he suggested I join The Weathering Shop's Rustbucket forum. Tons of great inspiration and examples of all kinds of weathering techniques. Just for fun and "street cred" (hopefully...), I added this photo of IMRL 232, completed in 2013 by CMPS and eventually sold off on Ebay. I'm really, really regretting that decision.


The unit was an undecorated Athearn/RPP shell that I assembled per prototype photos. The cut levers were custom formed out of brass wire, probably .012", to suit my own pedantic requirements. She was painted using Polly Scale UP colors and weathered with the standard chalk/Dullcote method, all the white ensuring that the windows stayed squeaky clean. A simple NCE decoder was then installed for maximum operating ability and lighting control. 


If the headlight and ditch lights look a little odd, that's because I used inset smd LED's set into the housings for maximum brightness and output. Running all the wires can get a little tedious, especially when putting the shell back onto the frame, but the results are worth it. 


Friday, January 3, 2020

AMTRAK!

I can't decide on a posting schedule so I said "self, just do it when you feel like it".

"Intrastate"
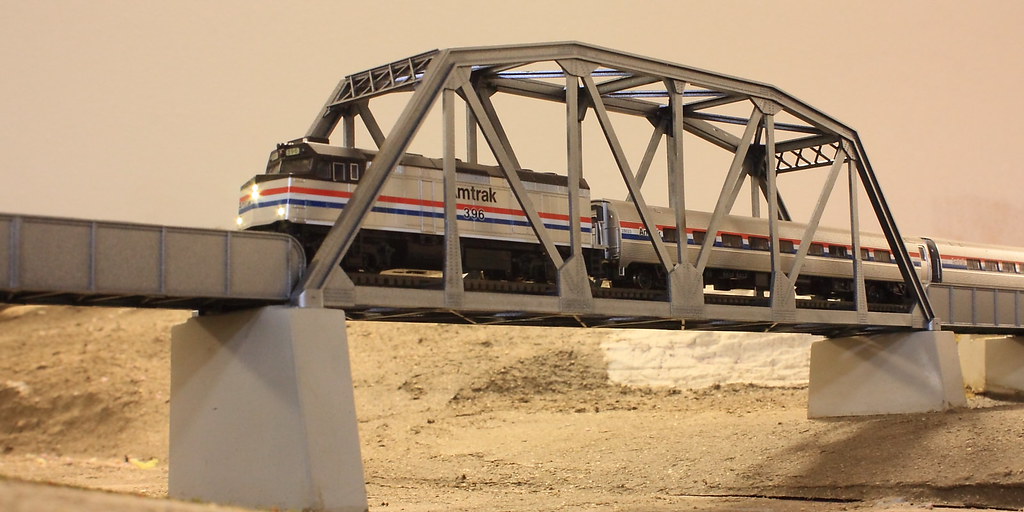
Amtrak train #369 putting along southbound towards Clemens. Scene loosely inspired by the Dubuque Tunnel.

Astute observers will note the odd combination of a locomotive and NPCU on the head-end, also Amtrak jargon for "non-powered-control unit". This will be totally SHOCKING, but this is due to a bad ordered m/u cable in the train set. The crew will have to run around the equipment before going north on their next tour of duty, which I'm sure they're very happy about doing! I might rename this the "Algonquin" since I forgot about that name until I looked at my older photos. Those Rapido units still need to receive some road grime and battle scars to really look the part, and I might also try and upgrade the LEDs to make them brighter since they do seem a bit dim out of the box. Yes, I have looked at the CV values using the Lokprogrammer...

"Algonquin"
 Amtrak train #359, the "Algonquin"

The first layout I built in our new home was short lived and N scale too, so these photos are a few years old. I made too many mistakes during the planning and construction (built too low, bad lighting, scenery too deep, etc) so it got torn down. 

"Bluffs, IL"

AMTK 396 leads train #359 into Bluffs, IL

The decision pushed me to sell off most of my N-scale equipment to fund a move to HO scale. The amount of detail parts and accessories, plus the DCC sound/lighting opportunities were just too much to pass up. Giving up the sort of space available in N scale was tough, but I've gotten used to it now. It seems like less is more, plus the time that can now go into detailing individual scenes and structures (still large enough to get noticed) in HO scale more than makes up for it.
That lone Superliner is over 1300 scale feet from the head end.


That's about it for now and since I did save most of this Amtrak equipment, maybe there is hope again for another N scale layout in the future...

Wednesday, January 1, 2020

NEW YEAR NEW POST

Happy New Year, etc...

Within the past few days I completed a small project that's been on my mind for a little bit, so here we have two trench boxes that I cobbled together from some scrap styrene sheet (.060"?) and rod. 


I should have taken more in-progress photos, but they're relatively simple to figure out. I gathered some dimensions from a company that sells these out in the "real world". They were finished with some chains and lifting lugs from that leftover 18awg wire, then weathered with a combination of acrylic paint and weathering powders mixed up with very dilute Mod Podge. 
The weathering technique was very similar to how I modeled some steel ingots last year. For that project, I simply used some flat clear acrylic and weathering powders and brushed it on. Athearn provided the parts from some of my old Blue Box projects...


Saturday, December 21, 2019

USDOT/MODOT BRIDGE PROJECT

 Temporary lane dividers installed.
 Various construction materials and storage container added...
 Safety railings for personal protection.
 Eye-level overview of the scene.
PALUMBO was selected as the contractor for this project...in a non-corrupt type of way.

CLLX 9012 & 9011

Chicago/Consolidated Locomotive Leasing 9011 and 9012 get their daily inspections before heading out into the real world on March 20, 2013.